After around 1 week of image processing I finally finished the Elephant’s Trunk Nebula!
This is the first narrowband image I have processed using false colour – in this case the Hubble Palette. I had a lot to learn. Trying the coax out the details and colours from a relatively short exposure proved to be very challenging.
The Elephant’s Trunk is an emission nebula some 2400 light years away from us in the constellation of Cepheus. It is currently thought to be an intense region of new star formation.
The image was taken on Exmoor using a Skywatcher Esprit 120 APO refractor with a ZWO ASI 1600mm Pro camera at F/7. Total exposure time was 2 hours 46 mins spread over 64 Mins Hydrogen Alpha, 58 Mins Oxygen III and 44 mins of Sulphur II. Alas I had to drop over 15 minutes of Sulphur II due to poor quality subframes.
Now that I have this kind of narrowband experience under my belt, I can safely say that these kind of images really require at least 10 hrs plus of exposure. I was having to fight noise and a poor signal to noise ratio every step of the way! Luckily with plate solving, I should be able to capture more data on a future date.
One of the biggest issues was the Sulphur II channel:
The Sulphur II channel had a weird grid of noise criss-crossing it…
As can be seen, this channel had a grid of noise superimposed on it – despite the subframes being dithered by the auto-guider. The Oxygen II channel had similar issues, but no where near as pronounced.
I have no idea what the cause of the issue is, but it required some seriously creative image processing to get rid of it. My only current theory is that perhaps the subframe exposures were too short for those kind of filters – they were only 2 minutes long. Maybe in the future I need to up this to 5 minutes?
Either way, despite the challenges, I’m very pleased with the end result and I can’t wait to get out there again and capture some more star light.
One hour of raw stretched Ha data. In all I took 3 hours of data across several filters. It will take me a week or two to process it, but I am expecting a great colour image from this!
This was my first time out for about two years, so I was a little rusty 🙂
All set up and ready to go! Or so I thought!
A few mistakes were made. Firstly, I had set up the tripod in daylight and used a compass to broadly align it. However, when I saw where North was, I didn’t believe it as I had imaged from this Exmoor site on several occasions and thought North was further to the right. My thinking was that the car was affecting the compass.
However, when the pole star appeared, it turned out the compass was right – funny that! So I had to rotate the whole mount around and level it with all the kit on it – not an easy thing to do! Especially with dusk light levels.
The other mistake was programmatic. I had programmed a meridian flip for the mount but had cut things way too fine within NINA – so fine that I didn’t take the filter wheel’s physical size into account. The upshot of this is that I had to halt the imaging session at one point to prevent the equipment being driven into the mount.
A close up of my mobile observatory. The only real hardware difference is a new focuser on the guiding camera which worked a treat.
To NINA‘s credit, it realised what had happened and relocated the target on the East side of the mount and continued imaging from where I left off. The lesson learned here is that when imaging near the zenith, try to meridian flip at least half an hour before the official calculated time!
Speaking of NINA, I can’t say enough good things about it. It is free and yet seems to perform much better than Sequence Generator Pro that I had previously been using. Specifically, it’s focusing runs were a lot faster and more accurate, plus its plate solving was incredibly quick too – no more failed plate solves for me!
It was an odd sensation running my first NINA sequence as I didn’t know what to expect, but everything just worked! It automatically slewed to the target then it plate solved and moved the mount to the exact position I had specified in its framing wizard. Absolutely amazing! If you are an imager and have not come across this software before, I highly recommend it!
Once again guiding proved problematic, though the calibration was one of the best I have seen. It’s not perfect, but a lot better than it used to be. This is partly down to my efforts to remove backlash from the mount. However, the intent is to do a full mount strip down to really address that issue. But that’s a task for later in the year.
Autoguiding calibration was pretty good… for me…
However, the actual guiding performance was sub-par. Perhaps not helped by my rushed Polar Alignment (I should have verified it’s accuracy before imaging commenced):
Terrible autoguding
I suspect the root cause of my guiding woes is that I’m imaging at F7 with a reasonably long focal length. The autoguide camera is actually looking through the same telescope via an off-axis-guider. This makes the autoguider extremely sensitive when compared to normal low F ratio rigs. Once my F5 80mm scope is commissioned next month I’m expecting to have an easier time of it 🙂
The big decision of the night was whether to guide or not. In my case, the guiding was actually causing elongated stars (the opposite of what it should be doing!). The irony was that without guiding the stars were perfectly circular….
In the end I decided to go with guiding for two reasons: 1) I need autoguiding to enable dithering. 2) It would produce a lot of logs that I could then analyse afterward to iteratively improve the guiding performance.
The first point needs some elaboration. Dithering is a technique of slightly moving the camera sensor around between exposures. This ensures that the same parts of an image fall onto different pixels on the sensor with each exposure.
This is important for the ZWO ASI 1600mm Pro camera as without dithering one gets vertical noise in the image which is exceedingly hard to process out. I figured it would be easier to repair elongated stars than it would be to remove vertical banding!
The image below was taken 2 years ago during an aborted run to image IC1396 and shows what this vertical banding looks like:
If you look carefully on the right and the lower parts of the above image you can see the vertical banding. This was a relatively short exposure. In my experience the banding gets much worse with more exposures (without dithering).
Now compare the above image with 1 hour of Hydrogen Alpha that I imaged on this run:
Much better! No banding! But alas the stars are a little elongated
As an aside, with my previous image run of M81/M82, I ran with guiding off. The reason being that the vertical lines are easier to remove in galaxy images as most of the image is just space and stars. In contrast, this image is pretty much 100% nebula. It is this that makes the removal of the vertical artefacts so difficult. Hence my decision.
Overall, the night turned out to be a good one and I ran the session for as long as the batteries held out, which on this night was to around three in the morning. I was particularly pleased with the Microsoft Surface laptop which lasted till three without having to use an external battery!
NINA was so reliable that I actually found a lot of time to do binocular visual observing.
Caught in the act! A car’s headlight illuminates my site during a series of widefield time lapse exposures. I’m leaning on the car to enable me to steady the binoculars for stable observing.
Luckily, I know where many of the objects are in the night sky as I cut my teeth as a visual observer with a non-computerised telescope. I was amazed at how many of them I could see with the binoculars. Observing at a dark site makes a huge difference.
Whilst I was observing the heavens, I set my normal terrestrial camera to work to see if I could improve my astrophotography with it. Given that it is using a bulk-standard kit lens I think I ended up doing pretty well:
You should recognize the constellation in the above picture! I now have nice round stars and pretty low noise, so I’m definitely getting the hang of it!
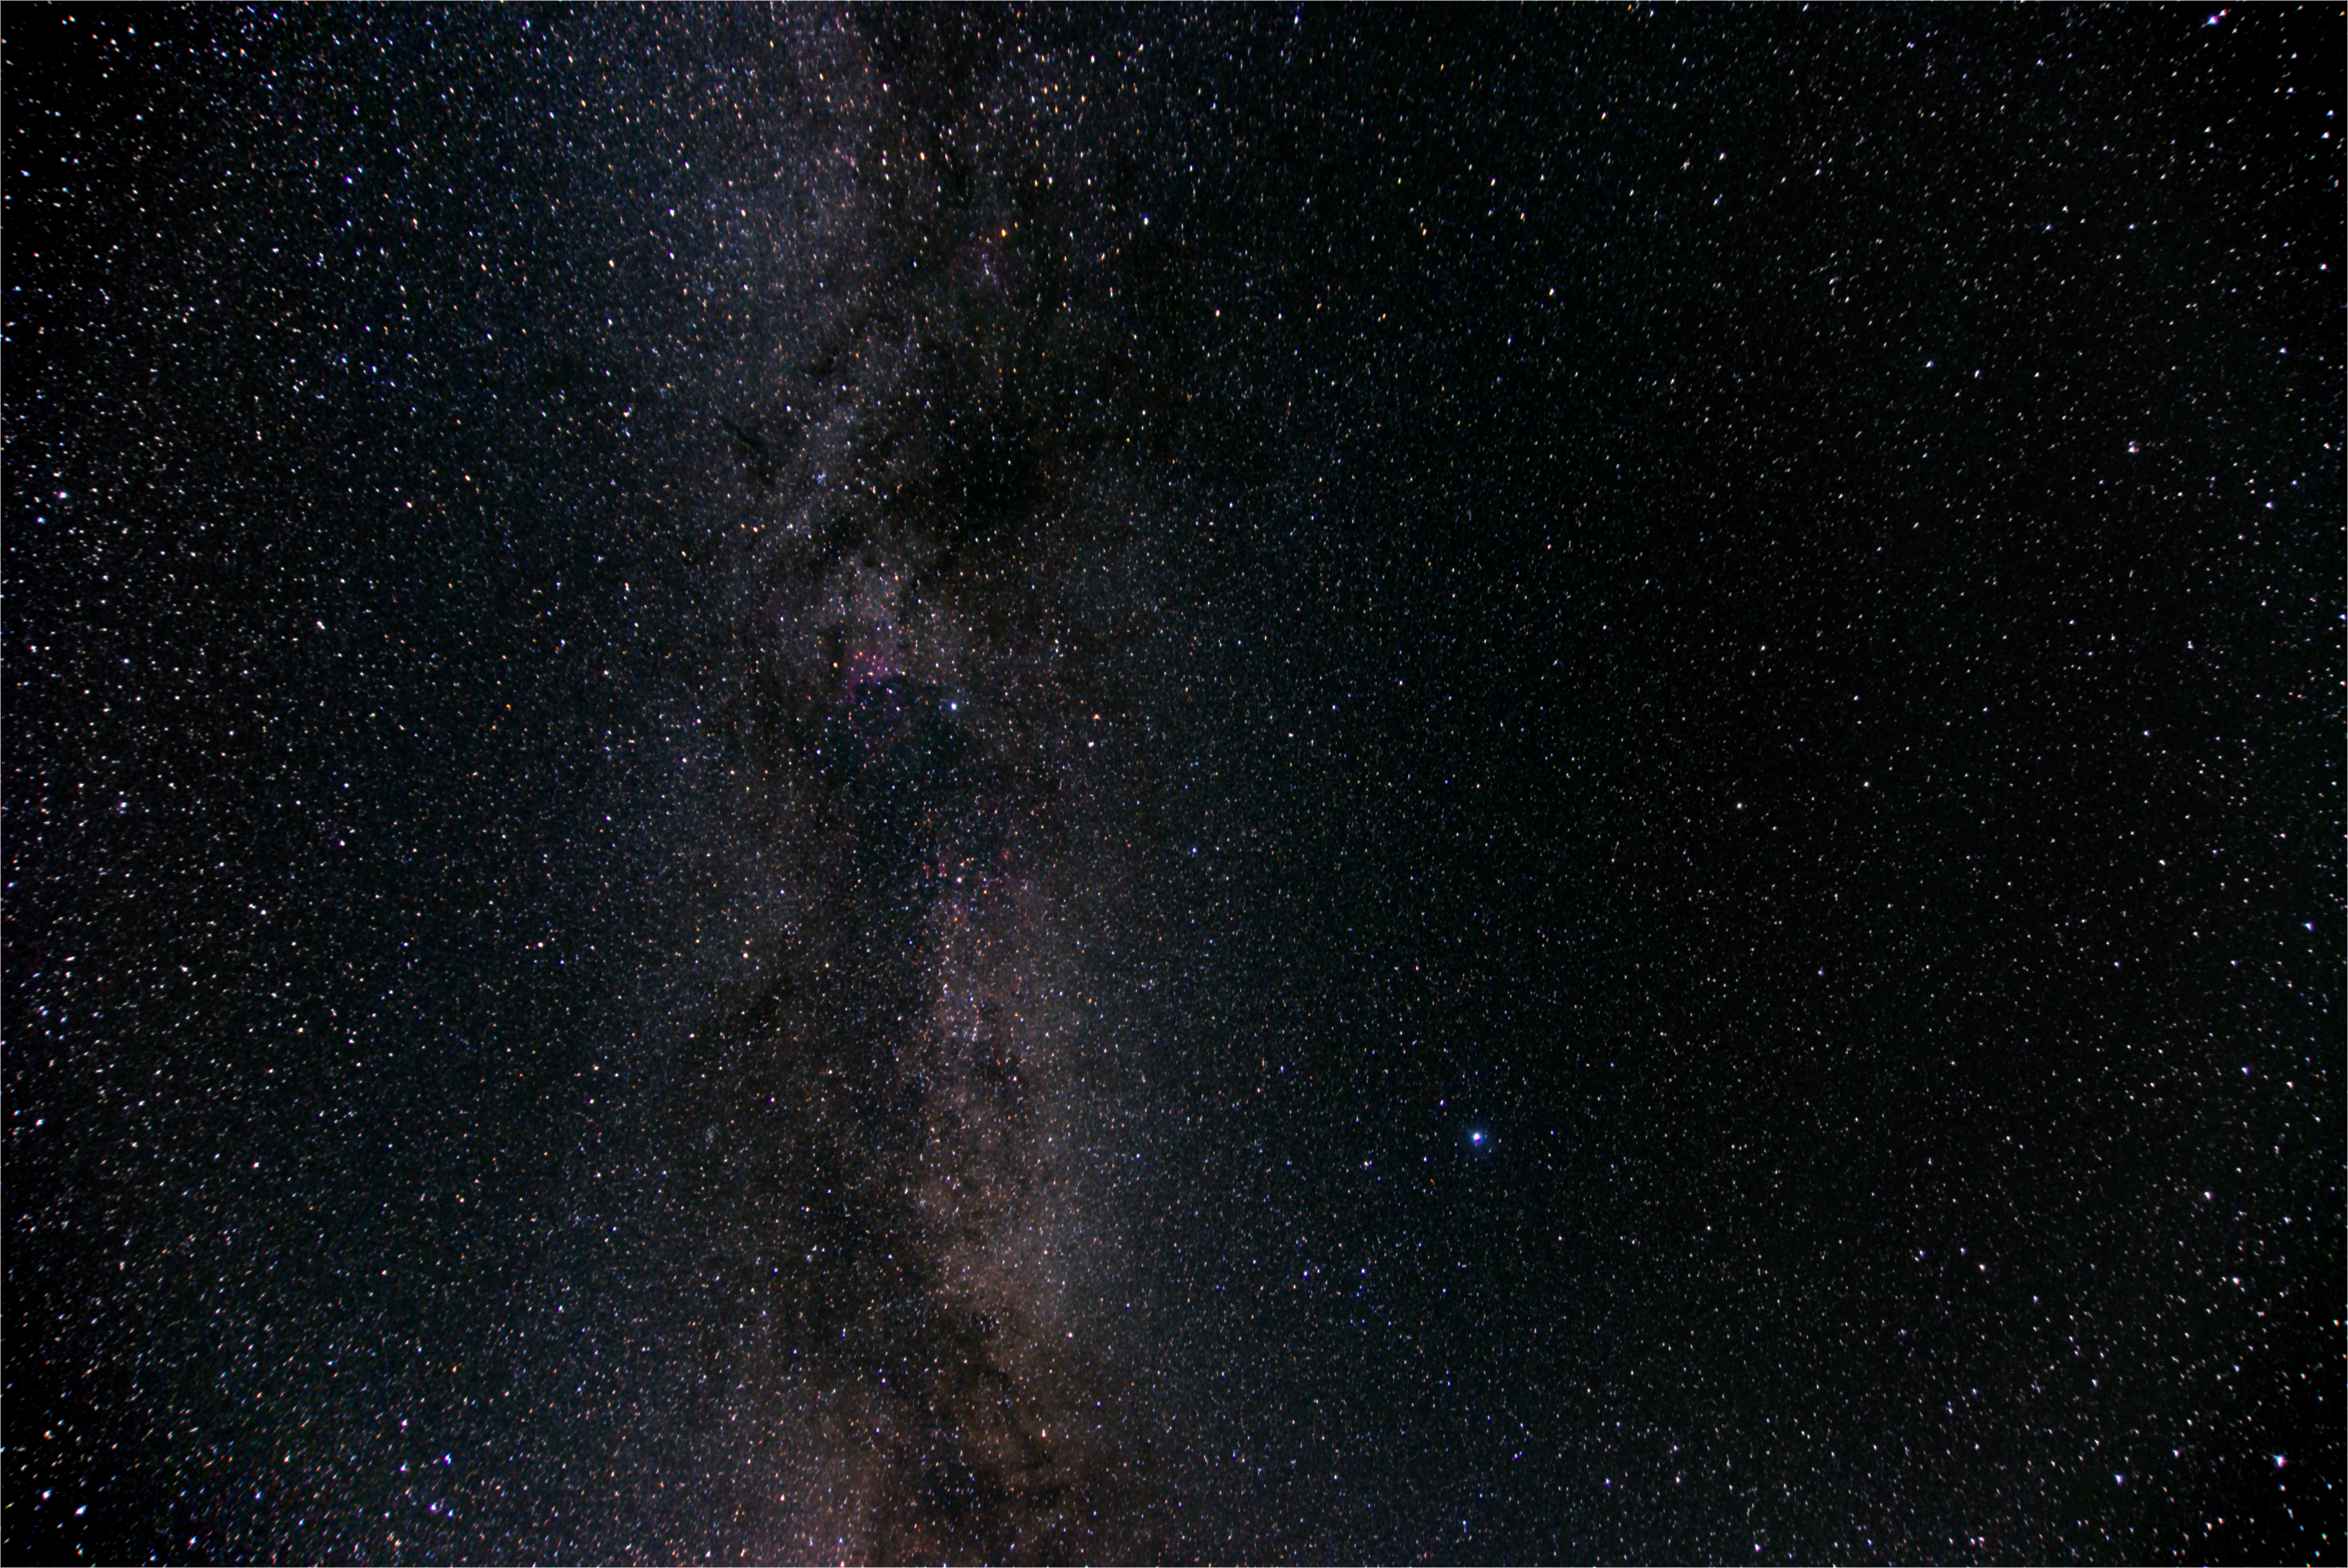
One of the best things with summer observing, is that the Milky Way is directly overhead. Everyone should try to at least view this from a dark site once in their lives – the view is spectacular! With binoculars you are inundated with a sea of thousands of stars – it’s just an amazing sight!
I did have a go at photographing it with my normal terrestrial camera:
The Milky Way! If you haven’t seen it, you should really take the time out to try!
The photo didn’t come out too badly for a kit lens, especially given my lack of experience with it. Next month I intend to get a low F ratio lens specifically for astrophotography which should improve these wide field shots!
That’s it for this blog post. Hopefully, I’ll have a colour photo of IC1396 to post in the next week or two!